T-Th 9:05
or
T-Th 11:15
in Olin 155
CS 1110: Introduction to Computing Using Python
Fall 2016
About:
Announcements
Staff
Consultants
Times & Places
Calendar
Materials:
Texts
Python
Command Shell
Terminology
VideoNote
Handouts:
Lectures
Assignments
Labs
Assessment:
Grading
Exams
Resources:
CMS
Piazza
AEWs
FAQ
Python API
Python Tutor
Style Guide
Academic Integrity
Assignment 7:
Breakout
Due to CMS by Sunday, December 4th at 11:59 pm.
|
This assignment, including some of the wording of this document, is adapted from an assignment by Professor Eric Roberts at Stanford University. Your task is to write the classic arcade game Breakout. If you have never played Breakout before, there are lots of versions online, particularly as flash games. The old school versions give you an example of the basic gameplay, though they are considered boring by modern standards. Most of the modern versions of Breakout were inspired by the Arkanoid series and have power-ups, lasers, and all sorts of weird features. The flash game Star Ball is an example of a fairly elaborate Breakout variant. One of the main challenges with this assignment is its scope is completely up to you. There is a bare minimum of functionality that you must implement; you must have all the features of an old-school Breakout game. But after that point, you are free (and encouraged) to add more interesting features to your game. The video to the right shows our solution, which has several extra features such as sound and a countdown timer. You should not feel compelled to add these features to your game. You are permitted to do anything that you want, provided that the basic functionality is there. |
|
Despite any difficulties you might have had with previous assignments, we know that this assignment is easily within your grasp. You just have to start early, break the problem up into manageable pieces, and program/test incrementally. Below, we discuss stages of implementation and give suggestions for staying on top of the project. If you follow our advice and test each piece thoroughly before proceeding to the next, you should be successful.
Our bare minimum solution is about 700 lines of code. This is ~230 lines in breakout.py (including the ~160 lines already there), ~200 lines in play.py (including the ~65 lines already there), and ~270 lines in models.py (including the ~100 lines already there). So you should expect to be write around 500 lines of code for the bare minimum solution. While this may seem intimidating, a good amount of that is headers and specification. Our minimum solution has ~20 methods across five classes, not including getters and setters.
Learning Objectives
This final assignment has several important objectives.
- It gives you practice with reading official class documentation and APIs.
- It gives you experience using stateful controllers to handle a complex, interactive application.
- It gives you experience with designing helper functions to structure your code properly.
- It gives you experience with using constants to make your code more readable.
- It gives you experience with programming animation and simple physics.
- It gives you experience with an open-ended project that is not fully-specified.
- It brings together everything you have learned in this class in one final assignment.
Table of Contents
Authors: W. White, D. Gries, E. Roberts
- Academic Integrity and Collaboration
- Organization and Scope
- Breakout
- The Basic Game
- Create a Welcome Screen
- Set up the Bricks
- Create (and Animate) the Paddle
- Create the Ball
- Move the Ball and Make it Bounce
- Check for Collisions
- Finish the Game
- Extending the Game
- Finishing the Assignment
Academic Integrity and Collaboration
Academic Integrity
This classic assignment has come to define the course, so we give this assignment every year. We do make minor changes each year, but you can find some old solutions out there if you look really hard. You can also find a lot of solutions for the Stanford version, but those are very different and will only confuse you.
Either way, please do not look at old solutions. In our experience, looking at a solution "contaminates" you. You will be unable to think of any other way to do the assignment, and you will be forced to copy the code either with or without attribution. Even copying with attribution will cost you points. Without attribution will be even worse, as that is an academic integrity violation.
Code Attribution
There is a lot of code available for you to use in in the lecture on GUI applications. The animation, arrows and subcontroller examples are particularly useful. You are permitted to copy whatever code you want from these (or other samples).
However, if you copy code you must cite the source. This is no different than quoting a book or article in an essay or research paper. In the function specification, you should add a paragraph citing the source module and the original authors (likely the CS 1110 instructors). You must cite your source even if you make changes; that is no different than paraphrasing a quote in an essay or research paper.
Unless you make drastic changes, Moss will catch any copying of the demo code from lecture. The code is too complex for accidental similarities to happen. Do it right; cite the source.
Copyrighted Material
There is another Academic Integrity issue with this assignment: copyrighted material. You do not own the rights to Pokémon. Pokémon is owned by Nintendo. The president of Nintendo America is a Cornell alum who visits campus regularly. Please do not encourage our alums to sue us by using Pokémon artwork in your game.
In general, you are only allowed to use copyrighted material if you have a license to do so. For example, many of the songs and sound effects in the NewGrounds library are available for you to use under an Attribution License. That means you are free to use it so long as you cite the source in your documentation (e.g. your header comments). This is okay. A license where you have to pay is not okay.
If you are in doubt as to whether you have a license to use something, ask us on Piazza.
Collaboration Policy
You may do this assignment with one other person. If you are going to work together, then form your group on CMS as soon as possible. If you do this assignment with another person, you must work together. It is against the rules for one person to do some programming on this assignment without the other person sitting nearby and helping.
We are allowing some limited additional collaboration. If you want to talk to other people in the class about how you broke up your code -- what goes in play.py and what goes in models.py -- you may do that as well. If you want ideas for method specifications, that is okay. The number 1 rule is this: with the exception of your CMS-registered partner, please do not look at anyone else's code or show your code to anyone else, in any form what-so-ever.
Organization and Scope
This is a long assignment, much like Assignment 6. Once again, the trick is to pace yourself. This can be finished by the end of classes, if you work a little bit every day (excluding the Thanksgiving break). With that said, we will be voting about a possible extension on Piazza.
While there are no unit tests this time, you should be able to figure out if everything is working simply by playing the game. There are no tricky "restore everything to how it was" like with Turtles. Just get the game working.
Assignment Source Code
The first thing to do in this assignment is to download the zip file code.zip from this link. You should unzip it and put the contents in a new directory. This time, you are going to get a directory with a lot more than usual. In particular, this zip file contains the following:
breakout.py-
This file contains the controller class
Breakout. This is the controller that launches the application. It is one of three modules that you will modify for this assignment. While it is the primary controller class, you will note that it has no script code. For that, you will use the module__main__.pybelow. play.py-
This file contains the secondary controller class
Gameplay. This class manages a single game of breakout. It works as a subcontroller, just like the example subcontroller from class. It is another of the three modules that you will modify for this assignment, and the one that will require the most original code. models.py-
This file contains the model classes
Ball,BrickandPaddle. If you want to add other model classes (e.g. power-ups), then you should add those here as well. This is the last of the three files you should modify for this assignment. constants.py-
This is a module filled with constants (global variables that should not ever change).
It is used by both
breakout.py,gameplay.py, andmodels.pyto ensure that these modules agree on certain important values. It also contains code for adjusting your brick size. You should only modify this file if you are adding additional constants as part of your extended features. game2d.py-
This file contains the view classes
GViewandGInput. It also contains the parent classes for your models and controller. Under no circumstances should you ever modify this file! __main__.py- This module contains the application code for this assignment. It is the module you run from the command line to start the game. However, the way that you run it is a tad unusual; see the instructions below. Do not modify this file!
Sounds- This folder is a list of sound effects that you may wish to use as part of your extensions. You are also free to add more if you wish; just put them in this folder. All sounds must be WAV files. While we have gotten MP3 to work on Windows, Python support for OS X is unreliable.
Fonts- This folder is a collection of True Type Fonts, should you get tired of the default Kivy font. You can put whatever font you want in this folder, provided it is a .ttf file. Other Font formats (such as .ttc, .otf, or .dfont) are not supported.
Images-
This folder is a collection of images that you may wish to use as part of
your extensions. The
class
GImageallows you to animate images in this game, should you wish. You can also use it to provide a background; just remember to draw the background image first.
For the basic game, you will only modify the first three files listed
above. The class Breakout is a subclass of the class
GameApp. Your model classes should all be
subclasses of GObject. As part of this
assignment, you are expected to read the online documentation
which describes how to use the basic classes.
Running the Application
Because there are so many files involved, this application is handled a little differently
from previous assignments. To run the application, put all of the files in a folder, and
give the folder a name like breakout. The file __main__.py turns
the entire folder, not just one module, into a script. To run the program, change the
directory in your command shell to just outside of the folder breakout
and type
python breakout
In this case, Python will "run the folder" by executing the application code in
__main__.py. This trick only works when you run the folder
breakout as a script; you cannot import the folder. If you wanted to
"import a folder" (which, for this assignment, you don't), you would create a file
called __init__.py.
Assignment Organization
This assignment follows the model-view-controller pattern discussed in class. The modules are clearly organized so that each holds models, the view, or a controller. The organization of these files is shown below. The arrows in this diagram mean "imports". So the Breakout controller imports the view and Play subcontroller. The Play controller imports the view and the models. This leads to an important separation of files. Breakout is never permitted to access anything in models.py and Play is never permitted to access anything in breakout.py. This is an important rule that we will enforce while grading.
You will notice that the models module imports the view because it needs the parent
class GObject to perform any drawing. In
practice, we often like to separate the model and view to cut down on the number of
arrows (less meetings between the various programmers). However, that would make this
assignment a lot harder. Fortunately, the view does not import anything (and should
not be modified). This means there are no cycles in this architecture
(e.g. A imports B imports C imports A). Cyclical imports are very dangerous and you
have to be careful with them in large applications. Avoiding cycles is one of the
reasons we draw pictures like the one below.
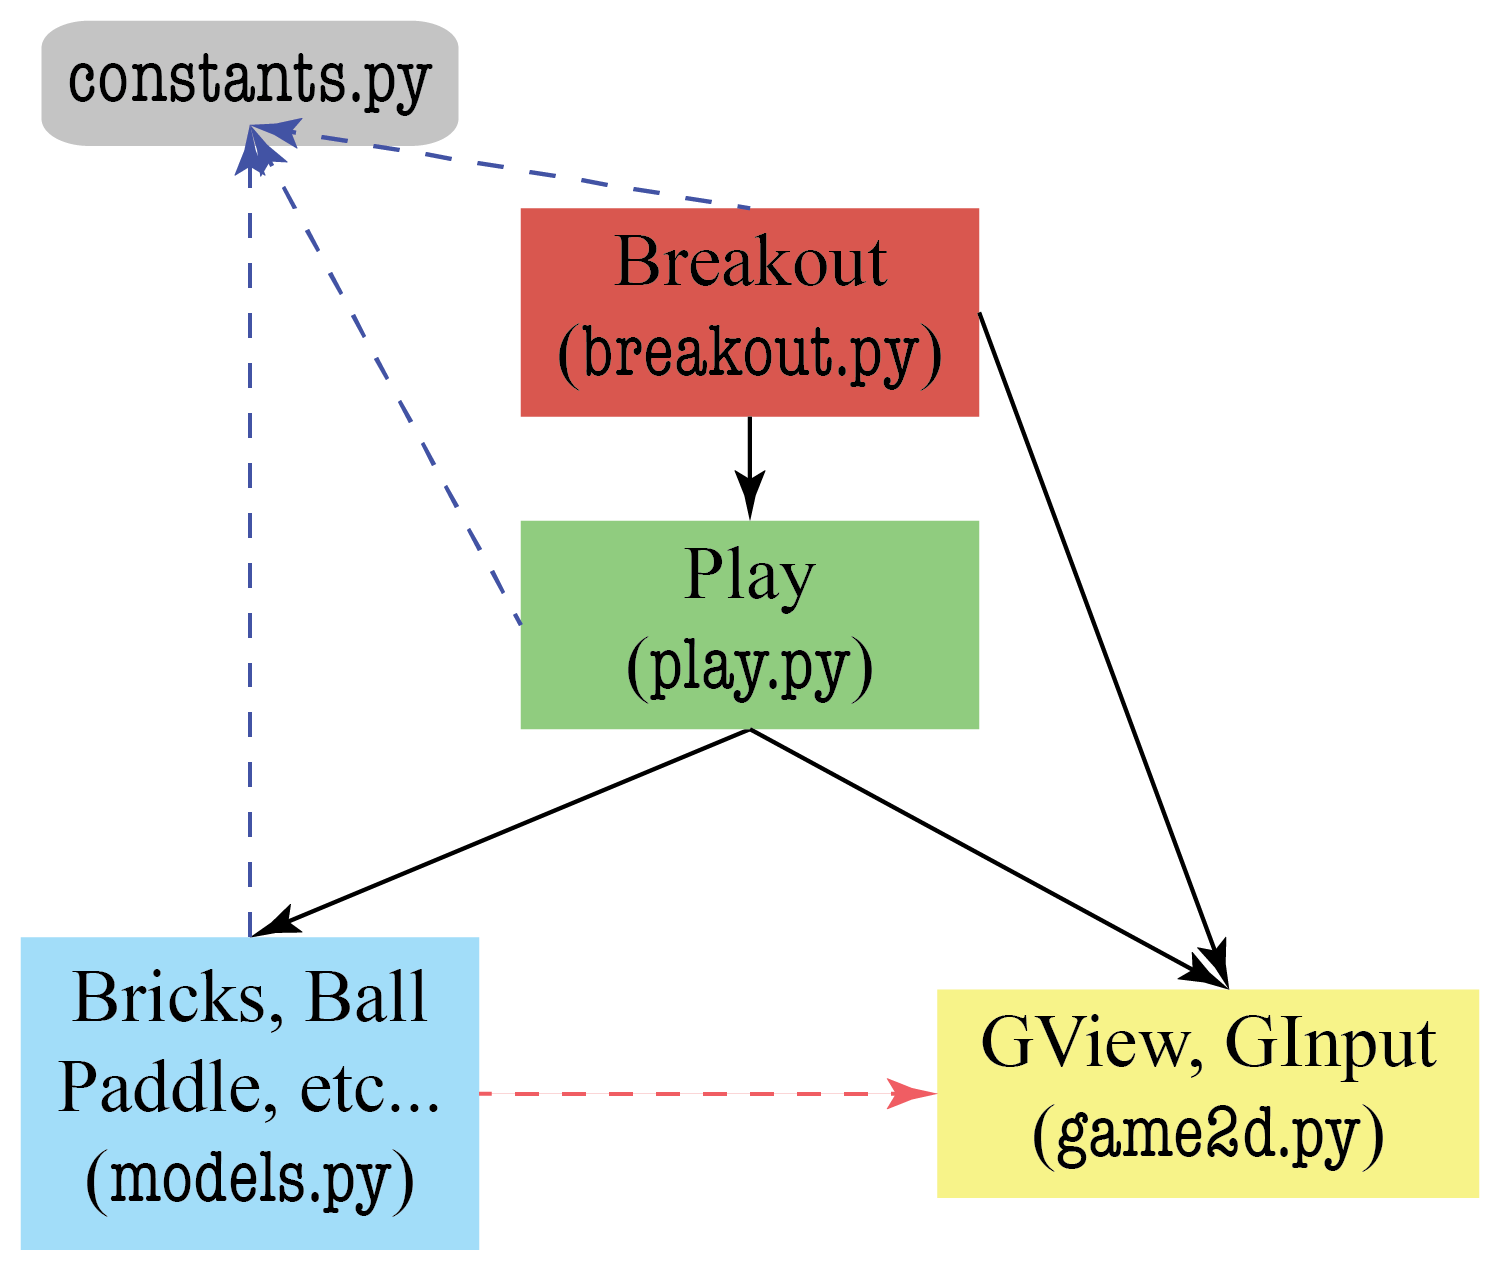
In addition to the four main modules, there is another module with no class or function definitions. It only has constants, which are global variables that do not change. This is imported by the model module and the two controllers; it is a way to help them share information.
Assignment Scope
As we explained in class, your game is a subclass of GameApp. The parent class does a lot of work for you. You just need to implement three main methods. They are as follows:
| Method | Description |
|---|---|
start() |
Initializes the game state and attributes. Because of how Kivy works, initialization code should go here and not in the constructor (which is called before the window is sized properly). |
update(dt) |
Updates the models for the next animation frame. The speed at which this
is called is determined by the (immutable) attribute fps,
which is set by the constructor. The parameter dt is time
since the last call to update.
|
draw() |
Draws all of the models to the screen. This is called when update is
complete. Implementing this method should be as simple as
calling the method draw
inherited from GObject.
|
Obviously, you are not going to put all of your code in those three methods;
the result would be an unreadable mess. An important part of this assignment
is developing new methods whenever you need them, so that each method is small
and manageable. Your grade will depend partly on the design of your program.
As one guideline, points will be deducted for methods that are more than 40 lines
long. This includes the specification (though start, update,
and draw are exempt from this rule regarding specifications).
You will also need to add methods and attributes to the class Play
in play.py, as well as Ball, Brick, and
Paddle in model.py. These classes are completely empty,
though we have given you a lot of hints in the class specification. You
should read all these specifications.
As you write the assignment, you may find that you need additional attributes. Whenever you add a new attribute to a class, you must fully state the invariant in your specification. All instance attributes should be hidden. While you do not need to enforce the invariants, you must have getters and setters if the attributes are accessed by a class in another model. For example, if the Play class needs to check the velocity of the ball, then you are going to need getters for the velocity in the Ball class.
When approaching this assignment, you should always be thinking about "what code goes where?" If you do not know what file to put things in, please ask on Piazza (but do not post code). In general, you should follow these guidelines:
Breakout
This controller does very little. All it does is keep track of the game state (e.g. whether or not the game is paused). Most of the time it just calls the methods of Play, and Play does all the work. However, if you need anything between games, like a paused message or a countdown clock, this goes here.
Play
This class does all the hard work. In addition to the initializer, it needs the following three methods as a bare minimum:
- A method to serve the ball (if it is lost, or the game is starting)
- A method to move the paddle
- A method to move the ball
The last one is going to be quite complex. If you try to write it as a single method, you are going to violate the 40 line rule. So you will need to add some helpers there as well. In general, anything that involves additional gameplay is going to go in this class.
The Models
The models just keep track of data. Most of the time, models just have attributes, with getters and setters. Think Dataset and Cluster from the previous assignment. However, sometimes models have additional methods that perform complex computation on the data, like distance and updateCentroid in class Cluster
The models in this assignment are the game objects on screen: the ball, the paddle, and the bricks. Of these three, it is more important to have a class for Ball. Ball needs additional attributes for its velocity, and you need several extra methods to perform complex calculations on this velocity.
The classes Brick and Paddle are subclasses of
GRectangle. You should not need any
new attributes for these two classes. However, you will want to write a
collides method in each of these classes
to detect collisions with the ball.
If your added features include power-ups, like those in
Arkanoid,
then you are going to need additional model classes. In that example, you are going
to need a class for the paddle to keep track of what power ups it has. As a general
rule, if your game object needs additional attributes that are not included
in GObject, then you are going to have
to create a new class.
Pacing Yourself
You should start as soon as possible. If you wait until the day before this assignment is due, you will have a hard time completing it. If you work on a little bit of it every day or every other day, thenyou will enjoy it and get it done on time. We have also tried not to include your Thanksgiving Break in this assignment.
The hard part of this assignment may be "finishing up": designing the final reorganization in order to incorporate three balls in a game. We have budgeted you one day for this, but you have up to three days if you decide just to do the bare minimum and not add any extensions.
You should implement the application in stages, as described in this handout. Do not try to get everything working all at once. Make sure that each stage is working before moving on to the next stage.
Set up a schedule. We have suggested some milestones, but make up your own schedule. Leave time for learning things and asking questions. Above all, do not try to extend the program until you get the basic functionality working. If you add extensions too early, debugging may get very difficult.
Getting Help
We have tried to give you as much guidance in this document as we can. However, if you are still lost, please see someone immediately. Like the last few assignments, this is a fairly involved project, and you should get started early. To get help, you may talk to the course instructor, a TA, or a consultant. See the staff page for more information.
In addition, you should always check Piazza for student questions as the assignment progresses. We may also periodically post announcements regarding this assignment on Piazza and the course website.
Breakout
The initial configuration of the game Breakout is shown in the left-most picture below. The colored rectangles in the top part of the screen are bricks, and the slightly larger rectangle at the bottom is the paddle. The paddle is in a fixed position in the vertical dimension; it moves back and forth horizontally across the screen along with the mouse (or finger, on a touch-screen device) — unless the mouse goes past the edge of the window.
 Starting Position |
 Hitting a Brick |
A complete game consists of three turns. On each turn, a ball is launched from the center of the window toward the bottom of the screen at a random angle. The ball bounces off the paddle and the walls of the world, in accordance with the physical principle generally expressed as "the angle of incidence equals the angle of reflection" (it is easy to implement). The start of a possible trajectory, bouncing off the paddle and then off the right wall, is shown to the right. The dotted line is there only to show the ball's path and will not actually appear on the screen.
In the second diagram above, the ball is about to collide with a brick on the bottom row. When that happens, the ball bounces just as it does on any other collision, but the brick disappears. The left-most diagram below shows the game after that collision and after the player has moved the paddle to put it in line with the oncoming ball.
 Intercepting the Ball |
 Breaking Out |
The play on a turn continues in this way until one of two conditions occurs:
- The ball hits the lower wall, which means that the player missed it with the paddle.
- The last brick is eliminated.
In the first case, the turn ends. If the player has a turn left, the next ball is served; otherwise, the game ends in a loss. In the second case, the player wins and the game ends.
Clearing all the bricks in a particular column opens a path to the top wall. When this delightful situation occurs, the ball may bounce back and forth several times between the top wall and the upper line of bricks without the user having to worry about hitting the ball with the paddle. This condition, a reward for "breaking out", gives meaning to the name of the game. The last diagram above shows the situation shortly after the first ball has broken through the wall. The ball goes on to clear several more bricks before it comes back down the open channel.
Breaking out is an exciting part of the game, but you do not have to do anything in your program to make it happen. The game is operating by the same rules it always applies: bouncing off walls, clearing bricks, and obeying the "laws of physics".
Game State
One of the challenges with making an application like this is keeping track of the game state. In the description above, we can identity several distinct phases of Breakout.
- Before the game starts, and the bricks are not yet set up
- While the bricks are set, but there is no ball yet
- While the game is ongoing, and the ball is in play
- While the game is ongoing, but the player is waiting for a new ball.
- While the game is paused (e.g. to show a message), and game is waiting for a key press.
- After the game is over.
Keeping these phases straight is an important part of implementing the game. You need this
information to implement update in Breakout correctly. For example,
whenever the game is ongoing, the method update should instruct the Play
object to move the paddle. However, if the game has just started yet, there is no Play
object and the the method update should create one.
For your convenience, we have provided you with constants for six states.
-
STATE_INACTIVE, before a new game has started -
STATE_NEWGAME, when it is time to create a new game -
STATE_ACTIVE, when the game is ongoing and ball is in play -
STATE_COUNTDOWN, when the player is waiting for a new ball -
STATE_PAUSED, when the game is paused to display a message -
STATE_COMPLETE, when the game is over
All of these constants are available in constants.py. The current application
state should be stored in the attribute _state inside Breakout.
You are free to add more states when you work on your game extensions.
However, your basic game should stick to these six states.
The rules for changing between these six states are outlined in the specification
of method update in Breakout. You should read that it in
its entirety. However, we will cover these rules in the instructions below as well.
The Basic Game
We have divided these instructions into two parts. The first part covers the basic things that you must implement just to get the game running. Once you do that, the assignment gets more interesting. You should try to finish everything in this part of the assignment by Friday, December 4 (the end of the last week of class). If you do that, you will be in good shape to add extensions (though you will not lose any points if you do not have extensions; they are a form of extra credit).
Before You Do Anything
The very first thing that you should do is read the file constants.py.
If you ever need a value like the size of the paddle, the size of the game window,
or so on, this is where you go. When writing code, you should always use the
constants, not raw numbers (or "magic numbers," as we call them). Magic numbers
make your code hard to debug. And if you make a change (e.g. to make the ball bigger),
you have no idea about all of the locations in your code that need to be changed.
With that said, you are welcome to change any of these numbers if you wish. You are also encouraged to add more constants if you think of other numeric values that you need. Anytime that you find yourself putting a number in your code, ask yourself whether or not it would make sense as a constant.
Create a Welcome Screen
We start with a simple warm-up to get you used to defining state and drawing graphics elements. When the player starts the application, they should be greeted by a welcome screen. When you work on your extensions, you can embellish your welcome screen to be as fancy as you wish. But for now, keep it simple. Your initial welcome screen is a simple text message.
![]()
Because the welcome message is before any game has started, it belongs in the Breakout class, not the Gameplay class. You are already seeing how we separate what goes where.
The text message will look something like the one above. It does not need to say "Press any key to play". It could say something else, as long as it is clear that the user press a key on the keyboard to continue. You also do not have to use the dreaded Comic Sans font like we have.
To create a text message, you need to create a
GLabel and store in it an attribute. If
you read the specification for class Breakout, you will see an attribute
named _mssg. This is for any messages to display to the player.
If you wish, you may rename this attribute, as long as you make it clear in the
class specification.
Since the welcome message should appear as soon as you start the game, it should
be created in the method start, the first important method of the class
Breakout. When creating your message, you will want to set things like the
font size and position of the text. As you can see from the documentation for
GLabel and
GObject, graphics objects have a lot of
attributes to specify things such as position, size, color, font style, and so on. You
should experiment with these attributes to get the welcome screen that you want. The
key thing to remember is that, in Kivy, that screen coordinates start from the
bottom-left corner of the window (and not the top right as with most graphics
applications).
Simply adding this code to start is not enough. If you were to run the
application right now, all you would see is a blank white window. You have to tell Python
what to draw. To do this, simply add the line
self._mssg.draw(self.view)
to the method draw in Breakout. The (non-hidden) attribute
view is a reference to the window; this instructs Python to draw this text
label in the window. Now run the application and check if you see your welcome message.
Initializing Game State
The other thing that you have to do in the beginning is initialize the game state.
The attribute _state (included in the class specification) should start
out as STATE_INACTIVE. That way we know that the game is not ongoing,
and that the program should (not yet) be attempting to animate anything on the screen.
In addition, the other attributes listed (particularly _game) should
be None; we have not done anything yet!
The _state attribute is an important part of many of the invariants in
this game. In particular, we want your new attribute for the welcome message to
have the following invariant:
-
If the state is
STATE_INACTIVE, then there is a welcome message -
If the state is not
STATE_INACTIVE, the welcome message is None.
Does your definition of start satisfy this invariant?
Dismissing the Welcome Screen
The welcome screen should not show up forever. The player should be able to dismiss the
welcome screen (and start a new game) when he or she presses a key. To respond to keyboard
events, you will need the attribute input, which is an instance of
GInput. This class has several methods for
identifying what keys are currently pressed.
When using the attribute input, remember the issues that we discussed in class.
The method update is called every 16 millisecond. If you hold a key down,
then you see a lot of key presses. You just want the first press! That means you need
some way to determine whether or not a key was pressed this animation frame, but not
in the previous one. See the sample code from class
on how to do this. This may require you to add a new attribute to Breakout.
If you detect a key press, then you should change the state STATE_INACTIVE
to STATE_NEWGAME. This will start a new game. You are not ready to actually
write the code to start the game, but switching states is an important first activity.
Invariants must be statisfied at the end of every method, so you need to assign None
to the welcome message as well. This will require a simple change to method
draw to keep it from crashing. Once you have done that, run the
application. Does the message disappear when you press a key?
Important Considerations
This first part of the assignment looks relatively straightforward, but it gets you
used to having to deal with controller state. In this part, you likely had to add
attributes beyond the ones that we have provided. Whenever you a new attribute, you
must add it and its corresponding invariant to the class specification. Add it just
after the comment starting "ADD MORE ATTRIBUTES", to make it easier for
the graders (and you) to find them. We will deduct style points for instance attributes
that are not specified.
Try to finish this part by Friday, November 18 (e.g. two days after starting the assignment). You will spend most of your time reading the online documentation. But this will give you a solid understanding of how this application works.
Create a Game and Populate it with Bricks
 The state
 STATE_NEWGAME is only supposed to last one animation frame.
When you are in this state, you should construct a new Play play object
and assign it to the attribute _game. The next animation frame, you
should switch to the state STATE_COUNTDOWN. Do not worry about this
second state; you will deal with it in the next task.
Right now, the constructor subcontroller Play does not do anything.
That is because you have not written an initializer yet. Eventually, your initializer
is going to create the bricks, a ball, and a paddle. Right now, we are just going to
focus on the bricks.
Creating Bricks
Read the specification for Play. You will see that it contains a
one-dimensional list of bricks. Your method __init__ should fill this
list with brick object, which are all instances of class Brick.
While you have not yet completed the definition of class Brick yet, we
have gotten you started in the module models.py. In particular, the
class Brick is a subclass of GRectangle.
That means it inherits all of its attributes and methods, including the initializer.
Hence (unless you override methods to do otherwise), you create and draw bricks
the same way you create and draw a GRectangle object.
To define a rectangle, use the attributes x, y, width,
height, linecolor, and fillcolor to specify how it
looks on screen. Look at the sample code from lecture
to see how to do this. You can either assign the attributes after the object is created,
or assign them in the constructor using keywords.
The meanings of all the attributes are actually explained in the documentation for
GObject. Note that x and
y are the center of the brick. If you want to place the left
edge, use the attribute left instead of x. When you color
a brick, you should set the line color so that its outline is the same color as the
interior (instead of black).
Look at the constants in constants.py. You need to draw BRICK_ROWS
rows of bricks with BRICKS_IN_ROW many bricks on each row. The module also
includes constants for how big to make the bricks, and how much space to put between them.
To get you started, you might want to create a single Brick object of some
position and size and add it to list, just to see what happens (though you will need to
figure out how to draw first). Then think about
how you can place the BRICK_ROWS rows of bricks. You will probably need a
loop of some kind. We do not care if it is a for-loop or a while-loop; just get the
job done.
When you are ready, you should set up the bricks as shown to the right. Again, the number,
dimensions, and spacing of the bricks, as well as the distance from the top of the window
to the first line of bricks, are specified using global constants given in module
constants. The only value you need to compute is the left attribute
of the first column, which should be chosen so that the bricks are centered in the
window, with the leftover space divided equally on the left and right sides
(Hint: the leftmost brick should be placed with left attribute
BRICK_SEP_H/2).
The colors of the bricks remain constant for two rows and run in the following sequence:
RED, ORANGE, YELLOW, GREEN,
CYAN. If there are more than 10 rows, you are to start over with RED, and
do the sequence again. We suggest that you add a constant BRICK_COLORS to
constants.py that lists these colors in an appropriate way to help with this.
Drawing Bricks
Once again, creating brick objects is not enough to draw them on the screen. But drawing
them is a bit more complicated than drawing the welcome message. The bricks are (hidden)
attributes in Play. Writing
  for b in self._game._bricks:
      b.draw(self.view)
is not allowed. We will take off style points if a class in one module ever accesses the hidden attribute of an object of a class in different module.
This is the purpose of the draw method in class Play. The draw
method in Breakout calls the draw method in Gameplay, which
calls the draw method for each brick (defined in
GObject).
However, only Breakout has access to the attribute view, which
is necessary for drawing. The class Play cannot directly access
any attributes in Breakout. If a method in Play needs an
attribute from Breakout, then Breakout must provide that
attribute as an argument in the method call. This means that the draw method
in Play needs to have view as a parameter, just like the
draw method in GObject.
Testing Your Code
When you are testing the later parts of this assignment, you should play with just 3-4 bricks per row and 1-2 rows of bricks. This will save time and let you quickly see whether the program works correctly when the ball breaks out (gets to the top of the window). It will also allow you to test when someone wins or loses. If you play with the default number of bricks (10 rows and 10 bricks per row), then each game will take a long time to test.
You might assume that testing in this manner requires you to change the values
of the global constants that give the number of rows and number of bricks in a
row. This is also undesirable, a you might forget to change them back. Instead,
we have added some clever code in constants.py that allows you to
change these constants when you start the application.
When you run your application (again, assuming that it is in a folder called
breakout) try the command
python breakout 3 2
BRICKS_IN_ROW to
3 and the value of BRICK_ROWS to 2.
You should make sure that your creation of the rows of bricks works with any number of rows and any number of bricks in each row (e.g. 1, 2, ..., 10, and perhaps more). This is one of the things we will be testing when we run your program.
Try to finish this part by Saturday, November 19. All you need to do is to produce the brick diagram shown above (after the welcome screen). Once you have done this, you should be an expert with graphics objects. This will give you considerable confidence that you can get the rest done.
Create (and Animate) the Paddle
Next you need to create the black paddle. Again, this is to be stored in an attribute
of class _game. That means that you must create it in the __init__
method of Play and modify your drawing code so that it appears. The paddle
should be an object of class Paddle, which is once again a subclass of
GRectangle.
Animating the Paddle
To animate the paddle, you will need to take into account the player's key presses. The paddle only moves when the player presses (or holds down) a key to make it move. By default, we assume that the player will use the left and right arrow keys to move the paddle. However, if you prefer WASD or some other control scheme, that is okay.
To see how to control the paddle, you should look at the arrows sample from class. This example shows how to check if an the arrow keys are pressed, and how to use that to animate a shape. Note that this is actually easier that dismissing the welcome message. We do not care if a key press is the first one. The paddle will continue to move so long as we hold down a key.
Moving the paddle is part of the game, so that means it belongs in the Play
class. We recommend a method with a name like updatePaddle. Remember that this
method must be called within the update method of Breakout, or
nothing will happen. To check the keyboard, the method updatePaddle will need
access to the input attribute Breakout, which is an instance of
GInput. Again, since Play is
not allowed to access any of the attributes of Breakout, that means you need
to pass input as an argument in this method call.
In the basic game, the paddle should only move left or right, not up and down.
Add to the x attribute to get it to move right, and subtract from it to
move it left. The amount you add or subtract is up to you. If the value is too small,
then the paddle will be slow and sluggish. If the value is too large, then the paddle
will zip across the screen and be hard to control.
Important Considerations
You should ensure that the paddle stays completely on the board even if the player
continues to hold down a key. If you do not do this, the paddle is going to be completely
lost once it goes off screen. Our code for this extra feature is 3 lines long; it uses
the functions min and max.
Your implementation should only allow the paddle to be moved when the game is ongoing.
That is, the state should either be STATE_COUNTDOWN or STATE_ACTIVE.
This means that update in Breakout is starting to get more complicatd.
At this point you might want to start thinking about helper methods to organize your
code better. Look at the state demo from lecture for
ideas on how to organize your code. In particular, you want a function to determine
the current state, and then helpers for each of the states.
Draw the paddle and get it move by Sunday, November 20. This is a really straight-forward challenge if you understand the arrows. Given all the work you have done so far, you should be able to complete this in an hour or so.
Create the Ball
You have almost completed the "setup" phase of the project. There is one more thing to do: create the ball and draw it on the screen. You do not need to worry about moving the ball yet. That is the topic of the next task.
Serve the Ball and Make it Move
The bricks and paddle where created in the __init__ method of
Play. However, we do not want you to create the ball in
this method. If you create the ball at the beginning, it will move before the
player can orient him- or herself to the game. This means the player will probably
miss the ball. Ideally, we should delay the ball a bit, giving the player time to
get ready.
This means that you will need a separate method to create the ball. You can call
this method serveBall or makeBall or whatever you want.
Breakout will call this method when it is time to serve the ball.
So when do you serve the ball? The frame after you create the bricks and paddle, your
application should be in the state STATE_COUNTDOWN. This is the state
before the game begins, while you are still waiting for the ball. Your game should
remain in this state for 3 seconds. When the 3 seconds are up, Breakout
will call the method to serve the ball. Immediately upon serving the ball, you
should switch the state to STATE_ACTIVE.
How do you delay something happening for 3 seconds? You are going to need yet another attribute (which you should specify) for keeping track of the time. For ideas on how to do this, look at how we time double clicks in the etch-a-sketch demo. Once again, you should cite the source if you copy any code.
Breakout is designed to run at 60 frames a second. So once the timer
passes 60, you can safely assume that 1 second has passed. If you really want to be
exact with your calculation, you can make use of the dt parameter in
update. This parameter stores a float that is the time (in seconds)
since the start of the last animation frame.
The timer needs to be initialized at the beginning of state STATE_COUNTDOWN.
That means at exactly the same time you set _state to STATE_COUNTDOWN,
you need to create an initializer the attribute for the timer. If you wait until the
helper for STATE_COUNTDOWN to initialize the timer, then the timer will
reset every animation frame and you will never serve the ball.
Customizing the Initializer
Once again, we have already started the class Ball for you. This time it
is a subclass of GEllipse. So you can
create and draw a ball, just as you do with the bricks and the paddle.
However, the ball needs more attributes that are available in
GEllipse. In particular, it needs attributes
_vx and _vy that keep track of the velocity. Therefore, you
will need to override the __init__ method in GEllipse and
provide your own. We do not care what the parameters for this method are. That is up
to you.
When you initialize the attribute _vy, the ball should head downward.
That means velocity should be negative. We suggest you start with a value of
-5.0 _vy; you can adjust this later as you see fit. The game would
be boring if every ball took the same course, so you should choose component
_vx randomly. Do this with the module
random, which
has functions for generating random numbers. You have already had some experience
with this module in the previous assignment.
To get you started, we suggest that you initialize _vx follows:
self._vx = random.uniform(1.0,5.0)

self._vx = self._vx * random.choice([-1, 1])
_vx to be a random float in the range 1.0 to 5.0
(inclusive). The second line multiplies it by -1 half the time (e.g. making it negative).
Moving the Ball
The last after serving the ball is to make it move. Right now, you will ignore all collisions with walls or bricks. These means that the ball will simply move off of the screen after a few seconds. That is okay. You will worry about making a proper game once you come back from Thanksgiving Break.
To move the ball, you need to add another method to Play. You can name this
method whatever you want, but we have called ours updateBall. This method
should not be hidden, since the Breakout controller will call it as part of
update whenever the state is STATE_ACTIVE. The purpose of this
method is to move the ball and handle any physics (which you will handle later).
Note that this method is only called if the state is STATE_ACTIVE, which is
why it is so important to change the state after moving the ball.
Each time the new method is called, it should move the ball one step. To do this, simply add the ball's velocity attributes to the ball's corresponding position coordinates. Since you are changing the attributes in the ball object, we suggest that you make this a method in the Ball class,
Try to finish this part by Tuesday, November 22, before you leave for Thanksgiving. The countdown part is the hardest challenge, and it is a great thing for you to get help on during the open office hours (replacing the labs) this week. If you get this far, you will be in great shape to finish up the last week of class.
Make the Ball Bounce
You are now past the "setup" phase and into the "play" phase of the game. In this phase, a ball moves and bounces appropriately. You should not be worried (yet) about losing the ball or removing bricks.
As the ball moves, it should change direction if it hits a wall. Do not worry about collisions with the bricks or the paddle just yet. For now, the ball will travel through them like a ghost. You will deal with collisions in the next task.
If the ball is going up, check if any part of the ball has a y-coordinate
greater than or equal to GAME_HEIGHT. In that case the ball has reached
the top and its direction has to be changed so that it goes down. You do this by setting
_vy attribute to -_vy. As Play cannot access
the attribute _vy in Ball directly, this requires another method.
Check the other three sides of the game board in the same fashion. When you have finished this, the ball will bounce around the playing board forever — until you stop it.
Keep in mind that it is not enough to simply look at the x or y
position of the ball. You want to know when any part of the ball has reached (or gone over)
one of the sides. For example, to see whether the ball has gone over the right edge, you
need to test whether the right side of the ball is over that edge. However, the attribute
x is the center of the ball. See the attributes in
GObject for clues on how to take care of
this problem.
Try to finish this part by Monday, November 28, after coming back from break.
Handle Collisions
Now comes the interesting (and hard) part. In order to make Breakout into a real game,
you have to be able to tell when the ball collides with another object in the window.
As scientists often do, we make a simplifying assumption and then relax the assumption
later. Suppose the ball were a single point (x,y) rather than a circle.
Then, for any GObject gobj, the method call
gobj.contains(x,y)
True if the point is inside of the object and False if
it is not.
However, the ball is not a single point. It occupies physical area, so it may collide with something on the screen even though its center does not. The easiest thing to do — which is typical of the simplifying assumptions made in real computer games — is to check a few carefully chosen points on the outside of the ball and see whether any of those points has collided with anything. As soon as you find something at one of those points (other than the ball, of course) you can declare that the ball has collided with that object.
 One of the easiest ways to come up with these "carefully chosen points" is to treat
everything in the game as rectangles. A
One of the easiest ways to come up with these "carefully chosen points" is to treat
everything in the game as rectangles. A GEllipse is defined in terms of
its bounding rectangle (i.e., the rectangle in which it is inscribed). Therefore the
lower left corner of the ball is at the point (x-r,y-r) and the other
corners are at the locations shown in the diagram to the right (r is the radius
of the ball). These points are outside of the ball, but they are close enough to make
it appear that a collision has occurred.
You should add the method collides to both the class Brick
and Paddle. This method returns true if the ball has collided with the
instance self of that class. For example, here is our specification
of collides in Brick:
def collides(self,ball):
    """Returns: True if the ball collides with this brick

    Parameter ball: The ball to check
    Precondition: ball is of class Ball"""
These methods will be similar, except for one important difference. A ball can collide with a brick going either up or down. However, no ball that is going upwards can collide with the paddle. This is a hack to prevent a problem where the ball might "stick" to the paddle (the concept is known as "tunneling" in game design and a proper fix is far beyond the scope of this course.
Next, you need to modify the updateBall method of Play,
discussed above. After moving the ball, check for a collision.
This will require you to check both the paddle and all the bricks.
If you find a collision, then you should negate the vertical direction of the ball (to make it bounce). If the collision was with a brick, then you should remove the brick as well. There is a possibility that the ball collides with more than one object. We suggest that you only pay attention to the first thing the ball collides with.
Once you have completed this, you should be able to start playing a game.
Important Considerations
As we said, the collision handling code belongs in updateBall.
However there is a lot of code here, and this may cause you to go over the 40-line
limit. This is an excellent place to use a helper.
Try to finish this part by Wednesday, November 30.. This is the hardest part of the assignment. Other universities (which we will not name) may give a similar Breakout assignment, but they think this part is too hard for their students and so they give them this part of the code. You are better than that. You can do this.
Finish the Game
You now have a (mostly) working game. However, there are two minor details left for you to take care before you can say that the game is truly finished.
Player Lives
You need to take care of the case where the ball hits the bottom wall. Right now, the ball
just bounces off this wall like all the others, which makes the game really easy. In reality,
hitting the bottom means that the ball is gone. In a single game, the player should get three
balls before losing. This requires a new attribute, either in Breakout or
Play. We will let you decide where it best fits.
If the player can have another ball, the update method should change the
state to STATE_PAUSED and display a message (as you did on the welcome screen)
that the player should click the screen to get a new ball. As soon as the player presses
a key, switch the state to STATE_COUNTDOWN and prepare to serve a new ball.
Winning or Losing
Eventually the game will end. Each time the ball drops off the bottom of the screen, you
need to check if there are any tries left. If not, the game is over. Additionally, as
part of the update method, you need to check whether there are no more bricks.
As you have been storing the active bricks in attribute _bricks, an easy way
to do this is to check the length of this list. When the list is empty, the game ends and
the player has won. Once again, Breakout cannot access this attribute
directly; you need a getter.
When the game ends, and the player has either won or lost, you should put up one last
message. Use a GLabel to put up a congratulating (or admonishing) message.
Finally, you should change the state one last time to indicate that the game is over.
This is the purpose of the state STATE_COMPLETE.
Try to finish this part by Thursday, December 1.
Extending the Game
If you have followed our suggested timeline, you now have three days to extend the game and
try to make it more fun. In doing this, you might find yourself reorganizing a lot of the
code above. You may add new methods, or change any of the methods you have written.
You may add new classes. For example, you may decide to make Brick a subclass
of GImage instead of GRectangle to allow for some cool image
effects. You can even change any of the constants or add new ones.
Anything you do is acceptable so long as the basic game is somewhat recognizable. Now that you have proved that you can get the code working, you are free to change it as you see fit. However, we highly suggest that you save a copy of the basic game in a separate folder before you start to make major changes. That way you have something to revert to if things go seriously awry when implementing your extensions. Also, we suggest that you make sure to comment your code well in order to keep track of where you are in the coding process.
Extensions are not mandatory, but they do affect grading. Add more and we will be much more lenient with our grading than if you implemented the bare minimum (i.e. everything up to this point). Hence they are a form of extra credit, but you cannot go over the maximum score for the assignment. Note that a submission that does not have good specifications for the helper methods or invariants for the new attributes will not be looked at kindly under any circumstances.
Possible Extensions
Here are some possible ways to extend the game, though you should not be constrained by any of them. Make the game you want to make. We will reward originality more than we will reward quantity. While this is a fairly simple game, the design space is wide open with possibilities.
Improve user control over bounces
The game gets rather boring if the only thing the player has to do is hit the ball.
Let the player control the ball by hitting it with different parts of the paddle. For
example, suppose the ball is coming down toward the right (or left). If it hits the left
(or right) 1/4 of the paddle, the ball goes back the way it came (both _vx
and _vy are negated).
Implement Mouse Control
Keyboard control is relatively easy. Working with the mouse is much harder. If you just have the paddle jump to where the mouse is, then the paddle will teleport all over the screen. This is not acceptable, as it makes the gameplay completely unbalanced.
The way to prevent teleportation is to move the paddle in so that between the paddle and place the player first clicked the mouse remains fixed at all times. This requires that you know the location of both the current touch location and the previous touch location. The attribute touch only stores the current touch, so you will once again need a new attribute (which we did not provide).
Implement sound effects
A really easy extension is to add appropriate sounds for game events. We have provided several audio files in code.zip. You are not restricted by those; you can easily find lots more. However, remember that it is a violation of the Academic Integrity Policy to use unlicensed copyrighted material.
To load an audio file, you simply create a Sound
object as follows:
bounceSound = Sound('bounce.wav')
Once it is loaded, you can play it whenever you want (such as when the ball hits something)
by calling bounceSound.play(). The sound might get monotonous after a while,
so make the sounds vary, and figure out a way to let the user turn sound off (and on).
Read the online specification to see how to use Sound objects. In particular, if you want to play the same sound multiple times simultaneously (such as when you hit two bricks simultaneously), you will need two different Sound objects for the same sound file.
Add a kicker
The arcade version of Breakout lures you in by starting off slowly. But as soon as you think you are getting the hang of things, the ball speeds up, making life more exciting. Implement this in some fashion, perhaps by doubling the horizontal velocity of the ball on the seventh time it hits the paddle.
Keep score
Design some way to score the player's performance. This could be as simple as the number of bricks destroyed. However, you may want to make the bricks in the higher rows more valuable.
You should display the score at all times using a GLabel
object. Where you display it is up to you (except do not keep the player from seeing the balls,
paddle, or bricks). Do not need to make a new GLabel object each time the
score changes. This will slow down the program tremendously. Simply change the
text attribute in your GLabel object.
Use your imagination
What else have you always wanted a game like this to do? At some point your game might stop being like Breakout and be more like Arkanoid. Do not go too wild with the power-ups, however. We much prefer a few innovations that greatly improve the play as opposed to a screen filled with gizmos.
Again, you can make any modifications to the gameplay you want, but the core gameplay of bricks, paddle and balls should be there. Please do not submit a copy of Asteroids and expect to receive credit.
Completing the Assignment
Before submitting anything, test your program to see that it works. Play for a while and make sure that as many parts of it as you can check are working. If you think everything is working, try this: just before the ball is going to pass the paddle level, move the paddle quickly so that the paddle collides with the ball rather than vice-versa. Does everything still work, or does your ball seem to get "glued" to the paddle? If you get this error, try to understand why it occurs and how you might fix it.
When you are done, re-read the specifications of all your methods and functions (including those we stubbed in for you), and be sure that your specifications are clear and that your functions follow their specifications. If you implemented extensions, make sure your documentation makes it very clear what your extensions are.
As part of this assignment, we expect you to follow our style guidelines.
- There are no tabs in the file, only spaces.
- Classes are separated from each other by two blank lines.
- Methods are separated from each other by a single blank line.
- Class contents are ordered as follows: attributes, getters/setters, initializer, operators, methods.
- Lines are short enough that horizontal scrolling is not necessary (about 80 chars is long enough).
- The specifications for all of the methods and properties are complete.
- Specifications are immediately after the method header and indented.
- No method is more than 40 lines long, including specification!
There is a new coding convention which we have not yet explicitly stated. Non-hidden methods should be in camelCase. That is, compound words are not separated by underscores, but instead have the first letter of each word (after the first) upper case. This allows us to distinguish methods from functions, as functions are all lower case separated by underscores. You are allowed to break this convention with hidden helper methods, but not in methods that are meant to be accessed by other classes.
Turning it In
You are potentially modifying a lot of files in this assignment. At a bare minimum,
your are modifying breakout.py, play.py, and models.py.
You might be modifying constants.py. You might have extra art and sound files.
In addition, you should create a text file called extensions.txt. In
this file, you should write a brief description of your extensions. Tell us
what you were trying to do and how you did it. If you used any art or sound assets that
required an attribution license, you should put that attribution here.
To simplify the submission process, we are not asking you upload each individual file.
Instead, put all your files in a zip file called a7.zip and submit this
instead. We need to be able to play your game, and if anything is missing, we cannot
play it.
Survey
One last time, we need you to do a survey. The survey should be done individually (even if you worked in a group). As always, the survey will ask about things such as how long you spent on the assignment, your impression of the difficulty, and what could be done to improve it. Please try to complete the survey within a day of turning in this assignment. Remember that participation in surveys comprises 1% of your final grade.