Project 1: Hybrid Images
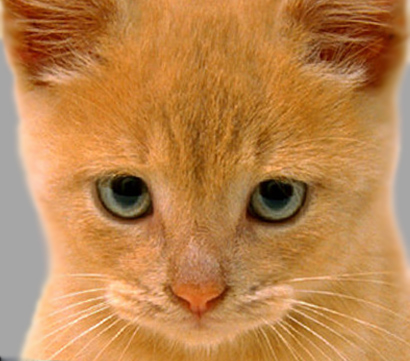
Look at the image from very close and then very far. What do you see?

Key Information
| Assigned | Tuesday, Jan 28, 2025 (Code accessible from GitHub Classroom) |
| Due | Friday, Feb 7 on GitHub Classroom by 8:00pm |
| Code Files to Submit |
hybrid.py (Push the latest implementation to your GitHub repo and check the instruction to create your environment based on config on Github) |
| Artifact Due | Monday, Feb 10 on CMSX by 8:00pm |
| Artifact Files to Submit |
README, left.png, right.png, hybrid.png (submit to CMSX ONLY) |
This project must be done individually (groups of one).
Overview
The goal of this assignment is to write an image filtering function and use it to create hybrid images using a simplified version of the SIGGRAPH 2006 paper by Oliva, Torralba, and Schyns. Hybrid images are static images that change in interpretation based on the viewing distance. The basic idea is that high frequency tends to dominate perception when it is available, but, at a distance, only the low frequency (smooth) part of the signal can be seen. By blending the high frequency portion of one image with the low-frequency portion of another, you get a hybrid image that leads to different interpretations at different distances.
You will use your own solution to create your own hybrid images.
In the Downloads section below, we provide a tutorial on how to set up a Python environment called cs5670_python_env for running this project. There is also skeleton code for a user interface on GitHub along with a file hybrid.py containing functions that you need to implement.
Note(!): We provide some test functions for you in
test.py. Please ensure that your code runs properly withpython test.pysince we use a similar setup to grade your submission (it is also very helpful to ensure you did everything correctly). These tests we provided are not sufficient to guarantee a correct implementation, so you should also thoroughly test your code as well.
Implementation Details
This project is designed to familiarize you with Python, NumPy, and image filtering. Once you have created an image filtering function, constructing hybrid images becomes relatively straightforward.
This project requires you to implement 5 functions each of which builds onto a previous function:
cross_correlation_2dconvolve_2dgaussian_blur_kernel_2dlow_passhigh_pass
-
Image Filtering. Image filtering (or convolution) is a fundamental image processing tool. See chapter 3.2 of Szeliski and the lecture materials to learn about image filtering (specifically linear filtering). Numpy has numerous built in and efficient functions to perform image filtering, but you will be writing your own such function from scratch for this assignment. More specifically, you will implement
cross_correlation_2d, followed byconvolve_2dwhich would usecross_correlation_2d. -
Gaussian Blur. As you have seen in the lectures, there are a few different way to blur an image, for example taking an unweighted average of the neighboring pixels. Gaussian blur is a special kind of weighted averaging of neighboring pixels, and is described in the lecture slides. To implement Gaussian blur, you will implement a function
gaussian_blur_kernel_2dthat produces a kernel of a given height and width which can then be passed toconvolve_2dfrom above, along with an image, to produce a blurred version of the image. -
High and Low Pass Filters. Recall that a low pass filter is one that removed the fine details from an image (or, really, any signal), whereas a high pass filter only retails the fine details, and gets rid of the coarse details from an image. Thus, using Gaussian blurring as described above, implement
high_passandlow_passfunctions. -
Hybrid Images. A hybrid image is the sum of a low-pass filtered version of the one image and a high-pass filtered version of a second image. There is a free parameter, which can be tuned for each image pair, which controls how much high frequency to remove from the first image and how much low frequency to leave in the second image. This is called the “cutoff-frequency”. In the paper it is suggested to use two cutoff frequencies (one tuned for each image) and you are free to try that, as well. In the starter code, the cutoff frequency is controlled by changing the standard deviation (sigma) of the Gausian filter used in constructing the hybrid images. We provide you with the code for creating a hybrid image, using the functions described above.
-
Forbidden functions. For just this assignment, you are forbidden from using any Numpy, Scipy, OpenCV, or other preimplemented functions for filtering. This limitation will be lifted in future assignments, but for now, you should use for loops or Numpy vectorization to apply a kernel to each pixel in the image. You are allowed to use basic matrix operations like np.shape, np.zeros, and np.transpose You are also allowed to use functions such as np.flip and np.pad, but we strongly encourage you to write your own code to better understand the process. The bulk of your code will be in
cross_correlation_2d, andgaussian_blur_kernel_2dwith the other functions using these functions either directly or through one of the other functions you implement.
We have provided a GUI in gui.py, to help you debug your image filtering algorithm. To see a pre-labeled version of the sample images run:
python gui.py -t resources/sample-correspondance.json -c resources/sample-config.json
We provide you with a pair of images that need to be aligned using the GUI. The code for alignment uses an affine transform to map the eyes to eyes and nose to nose, etc. as you specify on the UI. We encourage you to create additional examples (e.g. change of expression, morph between different objects, change over time, etc.). See the hybrid images project page for some inspiration. The project page also contains materials from their Siggraph presentation.
For the example shown at the top of the page, the two original images look like this:

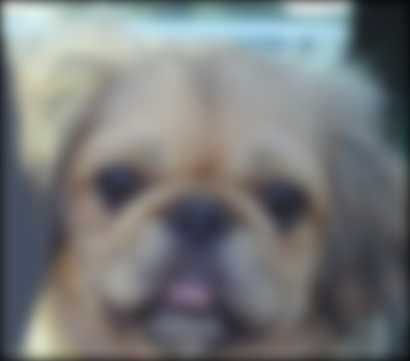
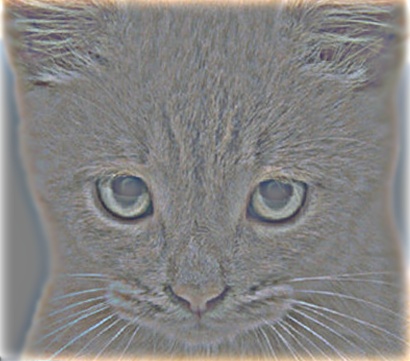
The low-pass (blurred) and high-pass versions of these images look like this:
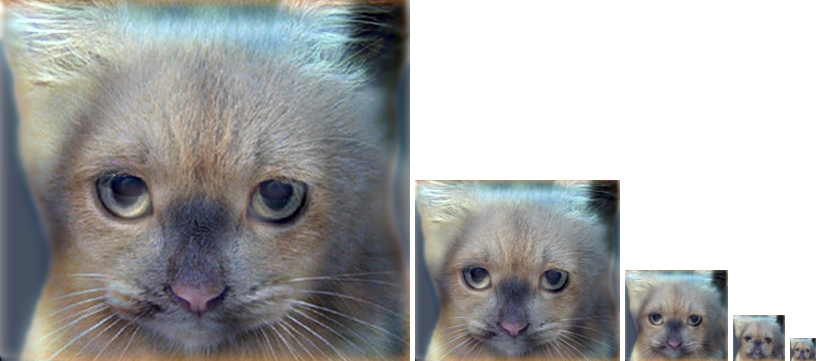
Adding the high and low frequencies together gives you the image at the top of this page. If you’re having trouble seeing the multiple interpretations of the image, a useful way to visualize the effect is by progressively downsampling the hybrid image as is done below:
Submission
GitHub Classroom (pushed to your linked Repo):
-
hybrid.py: Submit with all five functions implemented (please do not leave any extra debugging code outside of the designated TODO functions)
CMSX assignment artifacts (do not submit the files below to your Github Repo after the code deadline, as it may result in a late submission and cost you a late day!):
-
left.png,right.png: Submit the left and right images you used to create hybrid image.(could be in any format(not necessarily png) working withgui.py) -
hybrid.png: Submit the hybrid image produced by using your implementation and left,right images -
README:- Must contain high pass and low pass filter parameters(kernel size and kernel sigma) and Mix-in ratio.
- It should also contain which image’s higher/lower frequencies are used.
- Optionally you can add comments on something interesting or different you did in the project.
Please create the artifact files using your own images instead of the test image examples provided in the starter code.
Downloads
- Skeleton code on GitHub Classroom
- Tutorial on how to set up cs5670_python_env
Python and Numpy Tutorials
We will use python programming language for all assignments in this course. In particular, we will use Numpy for scientific computing. If you are not farmilar with python and numpy, the following websites provide very good tutorials for them. If you have any questions related to python and numpy, please go to TA office hour or post questions on Piazza.
- Numpy primer
- Python Numpy Tutorial from Stanford CS231n
- Official Numpy Quick Tutorial
- Numpy for Matlab users
- Short Python Tutorial
Acknowledgements
Assignment based on versions developed by James Hays and Derek Hoiem.