
519 Final Project Report
Keshav’s kids
Data Transfer
519 Final Project Report
Keshav’s kids
Data Transfer
Pratap Vikram Singh
Detailed class interfaces *
SourceMicrophone *
SourceFile *
SourceNet *
DestinationSpeaker *
DestinationFile *
DestinationNet *
Connection *
EncoderDecoderPCM *
NetworkStatistics *
WaveFormat *
References *
Our group had to take care of the transfer of data over the Internet. The tasks that we set out to do were:

Any audio recording device can capture the audio data. We used a microphone to capture the audio data. As all the applications using the data transfer layer were to be written in the Java language, we had to provide interfaces to them in Java classes.
Encoding and decoding of audio data
Audio data might need to be encoded and decoded form one format to another depending on its use. For example, audio to be transferred on phone lines need to be converted to the 8 bit ?-law and data to be played to a speaker might have to be converted to a format that it understand, like the linear 16 bit PCM format. This functionality was to be provided by the data transfer layer to the applications that used it.
Converting the audio data into packets to be transferred over the network
Audio data is captured and played as a stream. This means that it looks like a continuous flow of data from the source or to the destination. When the same data needs to be transferred over the network, it needs to be broken down into smaller pieces called packets that the network can easily transmit. This functionality was also to be provided by this layer, as the transfer of data should be transparent to the applications.
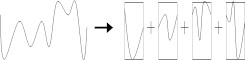
Figure 2. A wave stream broken up into smaller packets.
Sending and receiving audio data packets on the Internet using RTP
When discreet packets are sent over the network, the network does not differentiate between them. That means that the packets can get lost and reordered during transmission. To overcome this the data transfer layer uses a protocol to sequence the data and find out if they are getting delayed. This protocol is called the Real Time Protocol (RTP). This protocol is implemented by putting a unique source id in each packet that is sent from that source. It also puts in the time that the packet was generated and the sequence number of the packet. The time helps the data transfer layer to determine the delay that the packet encountered during transmission and the sequence number helps in detecting reordering and packet losses.
Provide network statistics to the user of the data transfer layer
It is very useful for the user of the data transfer layer to see how the data transfer is performing. This means that the data transfer layer has to keep track of various statistics of the audio data transfer. Some of the useful statistics would be the speed at which data is being transferred, the average size of the data packets, the number of lost packets and the mean delay between packets. All this can be used by the application to tune itself and also display the data visually to the end user.
Error correction using forward error correction, buffering and adaptive playout
As the data being transferred over the network can be lost or delayed or reordered, the data transfer layer needs to make corrections to it if possible. Audio data has some characteristics that need to be kept in mind. In case of lost packets, the data transfer layer can extrapolate the data and recreate the stream. In case of delayed packets, the layer can use buffering to store data and wait till some time before releasing it to the applications.
Defining appropriate interfaces to the data transfer layer so that applications can easily use it for transferring data over the Internet.
The data transfer layer was meant to
be used as a library by the applications so the key idea was to provide
convenient interfaces to them. We made interfaces for the source and destination
that could also be used by other applications to integrate with the data
transfer (two groups have done this to make completely new sources). We
tried to keep the interfaces to use the data transfer layer very simple
and as few as possible so that the applications have no problems in using
them. The actual code for using the data transfer layer is as simple as
creating a source, a destination, adding them to the connection class and
activating it. We also implemented some source and destination classes
for the applications to use like the microphone, speaker, file and network.
A class to convert between audio formats is also provided by the data transfer
layer. If the applications need to find out about the data transfer statistics,
an interface is provided to them for that.
The following features were included in the release
As the applications using the data transfer had to be written in Java, the recording interface had to be provided in Java. A Microphone class was provided for this with methods to open, close and read from it. This class actually used native methods written in C to access the microphone device. This native code was written as a Dynamically Linked Library (DLL) and called from the actual Java code using the JDirect interface to call native methods from DLLs. The various recording formats supported by the microphone are:
The audio playback was written only using Java and SDK3.1 for Java from Microsoft. We used the Java DirectSound classes that Microsoft released with the SDK. This enables us to playback audio within the browser because we are only using classes that are included with the Java virtual machine and therefore are running totally within a secure environment. Upon instantiation of the Audio playback class the applications tells the speaker in what format it wants to play data. The currently supported formats linear PCM 8-bit and 16-bit and multiple channels and various sample rates. If the library we released is used in conjunction with our playback 8-bit U-law and 8-bit A-law is also supported. The playback is buffered and has a queue to store packets on.
Audio data can be represented in many formats. The most common of them being linear PCM, A-Law and U-Law. The former format is generally obtained from waveform recording and playback devices and the latter is used for the transmission of voice on telephone lines. As the data transfer layer is used to mainly transfer audio data, there can be incompatibilities in the data formats. The gateway to this project needs to transfer data to and from telephone lines and it will be easier for them to get data in the appropriate format so the data transfer layer converts all data going to the network to the A-Law format. The data transfer layer provides a class for conversion of data from one format to another. The formats supported are 16 bit linear PCM and 8 bit A-Law. These two formats were chosen, as they were the most common ones used in the system. The data transfer layer encodes all data from the source to the 8 bit A-Law before sending them to the network. This also reduces the data size to half as 16 bits of data is converted to 8 bits. Apart from this the data transfer layer also checks for data format compatibility between different source and destinations and converts the data if needed to.
Automatic time synchronization, time-stamping and sequencing
As it is very common to have non-synchronized sources of data the need for a class that would be able to do automatic time synchronization, time stamping and sequencing arose. The procedure is as follows, a source reads from a non-synchronized source. It then instantiates a synchronization class and passes the waveformat and the audiopacket to the synchronization class. This class fills out all the fields needed, including the sequence field, time-stamp (depending on the amount of data and the amount of data already played) and delays the packet until it is time for it to be send. This is very helpful for sources of audio data that don’t have an automatic synchronization source like files. Examples of source that have an automatic synchronization source are microphones, phones, and other peripherals that sample audio.
Source and Destination interfaces for any application that wants to implement their own
After pondering over the design we decided that it would be very important that the applications would be able to implement their own sources and destinations. Therefore we decided to create interfaces that application groups could implement and use as sources and destinations. This strategy seems to have paid off because there are already two applications groups that have implemented their own sources and destinations using our interfaces. One group has used JChannel to transfer audio and another has created a mixer source.
Data sources and destinations implemented
Our implementation has three destinations and sources. We can read data from Microphone, network and files. We can write data to speaker, network and files. These have been implemented using the source and destination interfaces defined by the data transfer layer. The following have been implemented in the data transfer layer:
Sources
Our design decision to use Java almost exclusively (with the exception of the microphone everything is written Java) quickly showed us that tools and libraries on the Internet for transferring audio data are very few. After reading the specs for RTP a decision was made to implement RTP ourselves because trying to reuse a RTP library would entail getting a UNIX library to compile as DLL so we would be able to call the functions from Java because of the project requirements. Our implementation has been tested against the JMF packet and it works against that. The RTP uses UDP to transfer audio packets and it also contains fields for other important information has sequence number, synchronization source identifiers, timestamp and more.
Implementation of multiple destinations
As most of the applications used a single source and multiple destinations, they had to duplicate the connection class for each destination. Seeing this we provided them with interfaces to add multiple destinations to the same connection class. There are interfaces to add single destinations, remove single destinations and clean up all the destinations and start afresh. This helped the applications a lot and made their code easier to manage. The data transfer takes care of converting the format of the source to the format of the destination so it is completely transparent to the applications using it.
Packaging and delivery of code
The data transfer code is packaged as a single file of Java class libraries. It is an archive file and needs to be just put in the user’s CLASSPATH. There is a DLL included with the package that has to be located in the current directory or the system’s PATH. Documentation for each class was included in the package for the applications to refer to. There was even some sample code included to show the use of the data transfer libraries.
Audio Statistics from playback
While playback is running it is possible to get statistics from the playback. These include buffer underruns (which happen because the source is not producing enough data for the speaker), milliseconds of data in playback buffer (this is the actual sound buffer) and milliseconds on queue. Data is kept on queue before it is committed to playback buffer.
For every source transfer statistics
are collected. These include the number of packets received, the average
size of the packet.
A lot of time was spent on technical problems and implementing libraries that were readily available for C but not available for Java. This was true for RTP, the encoder and decoder and the audio capture and playback.
Both of us have used Java before in large projects but we hadn’t used Java in conjunction with C code and DLLs. This represented a quite a learning curve because we initially set out to use JNI which we then discovered that Microsoft had decided not to support and implement it in their version of Java. This meant that we had to use JDirect, which was quite nice actually. The only problem was that the machines in the M.Eng. Laboratory were not equipped with the correct version of the Java SDK. The old versions of (JVC) the Java compiler from Microsoft did not support JDirect. This meant that we had to get SDK3.1 from Microsoft installed on a few machines. This unfortunately cost us a lot of time that would have been better spent elsewhere.
DirectX is a very nice class library. Unfortunately the proved to be hard to use for Java because most of the examples are for C++ but not for Java. Therefore they were a bit cryptic to use and we ran into several problems concerning setting the playback buffers.The DirectX release for Java does not have any support for the microphone so we had to revert back to writing native C code for it though DirectX 6.0 contains support for microphone but it is not available for WinNT.
After spending some time researching the Internet we discovered there are no open source or closed source implementation of RTP for Java that we could use. This essentially meant implementing the missing functionality in Java which took a bit of work.
This proved to be a hard one to do correctly in Java. The machines in the M.Eng. Lab are very slow (old P166) and the Java virtual machine is a resource hog. The playback to speaker is run in a very tight thread. That is the only way to ensure that playback is jitter free. On these old machines it proved to be very hard to get jitter free, low latency output. The lowest latency we got after some fine tuning proved to be around ~250 ms. On a nice 400 PII with Win98 we reached around ~75 ms delay (35 ms of which it is impossible to get around because of the design of DirectX). This meant that our code turned out to be tuned to some specific speed and some rewriting was in order. We then tried to rewrite it to be self adapting but that turned out to be much harder than we excepted. This would probably not been a problem had we used C++ to write the playback because the speed of the code is of an order of magnitude faster. When we tested the playback on a very fast (450 PII) NT machine we got the same behavior characteristics as with a much slower machine with NT so our code has some bad latency issues.
Problems in coordinating your work with others
There was no problem coordinating work
with others. The applications group used our package so they had to coordinate
with us. In that sense we were just supporting our code which took a bit
of our time. This was very good though because this was the best way to
test our classes.
The Data Transfer layer provided the following interfaces to the applications:
public interface SourceDestination
{// Interface to read data from the source}
public AudioData Read();// Interface to get the encoding mode of the source
public int getEncodingMode();// Interface to set the SSRC number of the source(used in RTP)
public void setSSRC(int SSRC);
public interface Destination
{// Interface to write data to the destination}
public void Write(AudioData wrt);// Interface to get the encoding mode of the destination
public int getEncodingMode();
interface EncoderDecoder
{// Interface to encode the audio data}
public AudioData encode(AudioData audio);// Interface to decode the audio data
public AudioData decode(AudioData audio);
/**SourceFile
* Class for abstracting the Microphone device. This class enables
* the user to read audio data from the Microphone device. While
* constructing the object, a particular audio format can be specified
* to the class or else the default format will be used. This class is
* implemented using native calls to the waveform audio APIs of the
* Microsoft Windows operating system. The native library used with this
* class is called <code>Microphone.dll</code> and must be there either
* in the same directory as the class files or in the system
* <code>PATH</code>.
*/
public class SourceMicrophone implements Source
{/**}
* Constructor for the microphone device. It forms a default
* <code>WaveFormat</code> object.
*/
public SourceMicrophone();/**
* Constructor for the microphone device specifying the
* <code>WaveFormat</code> object.
* @param recordingFormat The WaveFormat object specifying the
* format of the recording.
*/
public SourceMicrophone(WaveFormat recordingFormat);/**
* Accessor for getting the recording format for the microphone.
* @return WaveFormat Returns a copy of the audio format object.
*/
public WaveFormat getRecordingFormat();/**
* Method to open a microphone. This method returns true if
* the microhone is already open otherwise it opens the microphone.
* @return boolean Returns true on success otherwise false.
*/
public boolean Open();/**
* Method to read data from the microphone. This method constructs
* an <code>AudioData</code> object and returns it.
* @return AudioData The object containing the recorded data.
*/
public AudioData Read();/**
* Method to close the microphone device. This method will close the
* device if it is not already closed.
*/
public void Close();/**
* Accessor method to get the audio encoding mode.
* @return int The encodidng mode of the recorded audio data.
*/
public int getEncodingMode();public void setSSRC(int ssrc);
public class SourceFile implements SourceSourceNet
{/** }
* Constructor for the SourceFile
* @param filename The filename of the file to open
* @param waveFormat The waveFormat of the file
* @exception FileNotFoundException FileNotFoundException is thrown if
* the file is not found
* @exception SecurityException SecurityException is thrown if the program
* is not allowed to open the file
*/
public SourceFile(String fileName, WaveFormat waveFormat) throws FileNotFoundException, SecurityException, IOException/**
* Constructor for the SourceFile
* @param filename The filename of the file to open
* @exception FileNotFoundException FileNotFoundException is thrown if
* the file is not found
* @exception SecurityException SecurityException is thrown if the program
* is not allowed to open the file
*/
public SourceFile(String fileName) throws FileNotFoundException, SecurityException, IOExceptionpublic AudioData Read();
public int getEncodingMode();
public void setSSRC(int ssrc);
public class SourceNet implements SourceDestinationSpeaker
{/** }
* Constructor for SourceNet
* @param p The port number to listen to
* @exception Exception Throws Exception when it can't allocat port number
*/
public SourceNet(int p) throws Exceptionpublic AudioData Read();
public int getEncodingMode();
public void setSSRC(int ssrc);
public class DestinationSpeaker implements Destination, DirectXConstantsDestinationFile
{/**}
* Constructor for the DestinationSpeaker class
* @param waveFormat The wave format of the output. The speaker excepts its data in this format
* @param c The parent component!
*/
public DestinationSpeaker(WaveFormat waveFormat, Component c);/**
* Constructor for the DestinationSpeaker class
* @param waveFormat The wave format of the output. The speaker excepts its data in this format
* @param c The parent component!
*/
public DestinationSpeaker(WaveFormat waveFormat, Component c, boolean quality);/**
* Constructor for the DestinationSpeaker class
* @param c The parent component!
*/
public DestinationSpeaker(Component c);public void Write(AudioData audio);
public int getEncodingMode();
public class DestinationFile implements DestinationDestinationNet
{/**}
* Constructor for destination file
* @param fileName The filename which to write the audiostream
* @exception IOException Thrown if file couldn't be opened
* @exception SecurityException Thrown if security doesn't allow us to write
*/
public DestinationFile(String fileName) throws IOException, SecurityExceptionpublic void Write(AudioData audio);
public int getEncodingMode();
public class DestinationNet implements DestinationConnection
{/**}
* Constructor for the DestinationNet
* @param address The address which to send the audiodata packets to
* @param p The port number to send to the audiodata packets to
*/
public DestinationNet(InetAddress address, int p);public void Write(AudioData audio);
public int getEncodingMode();
public class Connection implements RunnableEncoderDecoderPCM
{public Connection();}// Activates the connection and returns
public synchronized void Activate();// Tear down a data path
public synchronized void Stop() throws Exception/**
* This set the audiodata source
* @param s Set the source for this connection class to s
*/
public synchronized void setSource(Source s);/**
* Adds a destination to the connection
* @param d The destination to be added to the class
*/
public int addDestination(Destination d);/**
* Removes all destinations from the connection class
*/
public void removeAllDestinations();/**
* Removes a destination from the connection class
* @param key The key returned in the addDestination function
* @return boolean True if the destination could be removed, false otherwise
*/
public boolean removeDestination(int key);/**
* Returns the state of the source
* @return boolean True if the source is still producing data, false otherwise
*/
public boolean getConnectionState();
/**NetworkStatistics
* u-law, A-law and linear PCM conversions.
*/
public class EncoderDecoderPCM implements EncoderDecoder
{/* Decode ULawToLinear */}
public AudioData decode(AudioData data);/* Encode LinearToUlaw */
public AudioData encode(AudioData data);
public class NetworkStatisticsWaveFormat
{public int getDroppedPackets();}public int getOutOfSequence();
public int getAveragePacketSize();
public int getTotalNumberOfPackets();
/* Parse an AudioData packet and harvest statistics */
public void parsePacket(AudioData data);
/**
* Class for defining the WaveFormat structure. This class can be
* used to set the parameters for sound capture or playback on the
* speaker or the microphone.
*/
public class WaveFormat
{/**}
* Constant for 16 or 8 bit linear PCM one channel audio format as defined
* in the windows header file MMREG.H
*/
public static final int WAVE_FORMAT_PCM=1;/**
* Constant for A-Law 8 bit one channel audio format as defined
* in the windows header file MMREG.H
*/
public static final int WAVE_FORMAT_ALAW=6;/**
* Constant for U-Law 8 bit one channel audio format as defined
* in the windows header file MMREG.H
*/
public static final int WAVE_FORMAT_ULAW=7;/**
* Default constructor for the WaveFormat object. It
* uses the U-LAW audio format, 8 bits per sample and
* 8000 samples per second.
*/
public WaveFormat();/**
* Constructor for the WaveFormat object.
* @param formatTag The format of the audio data.
* @param samplesPerSec The number of audio samples per second.
* @param audioChannels The number of audio channels
* @param bitsPerSample The number of bits per sample if we have formatTag = WAVE_FORMAT_PCM
*/
public WaveFormat(int formatTag, int samplesPerSec, int audioChannels, int bitsPerSample);/**
* Constructor for the WaveFormat object.
* @param formatTag The format of the audio data.
* @param samplesPerSec The number of audio samples per second.
* @param audioChannels The number of audio channels
*/
public WaveFormat(int formatTag, int samplesPerSec, int audioChannels);/**
* Constructor for the WaveFormat object.
* @param formatTag The format of the audio data.
* @param samplesPerSec The number of audio samples per second.
*/
public WaveFormat(int formatTag, int samplesPerSec);/**
* Copy Constructor for the WaveFormat object.
* @param w The <code>WaveFormat</code> object to use for copying attributes.
*/
public WaveFormat(WaveFormat w);/**
* Accessor method for the bits per sample atrribute.
* @return int The number of bits per sample of audio data.
*/
public int getBitsPerSample();/**
* Accessor method for the number of channels in audio.
* @return int The number of channels for the audio data.
*/
public int getChannels();/**
* Accessor method for the audio format atrribute.
* @return int The format of the audio data.
*/
public int getFormatTag();/**
* Accessor method for the samples per second atrribute.
* @return int The number of samples of audio data per second.
*/
public int getSamplesPerSec();/**
* Mutator method for the audio format atrribute.
* @param formatTag The format of the audio data.
*/
public void setFormatTag(int formatTag);/**
* Mutator method for the samples per second atrribute.
* @param samplesPerSec The number of samples of audio data per second.
*/
public void setSamplesPerSec(int samplesPerSec);
| Http://www.cs.orst.edu/~kleinro/nacse/rtp/Various RTP implementations. | |
| http://www.cis.ohio-state.edu/htbin/rfc/rfc1889.html | RFC for the RTP implementation. |
| Http://www.rasip.fer.hr/research/compress/algorithms/fund/pcm/index.html | Audio data compression algorithms. |
| Http://teltec.ucd.ie/speech_software.htm | Sample C compression code. |
| Http://www.microsoft.com/java | JDirect reference. |
| Http://www.microsoft.com/directx | DirectX API references. |
| Http://msdn.microsoft.com | API Reference |
| Adaptive Playout Mechanism for Packetized Audio Applications in Wide-Area Networks | Playout |
| 519 course web page | Format of the report. |