Michael Wu
(myw9)
CS 5670:
Computer Vision
October 19,
2012
Project 3: Panorama Mosaic Stitching

Houston Pond, Cornell Plantations
I. Overview
The purpose of this project was to create an application to automatically stitch a sequence of photographs into a 360 degree panorama. SIFT features were used to match corresponding pixels in adjacent images. Two methods were used to align image pairs: (1) spherical projection onto a unit sphere and (2) direct homography transformations. Finally, the aligned images were blended together to form the final panorama image.
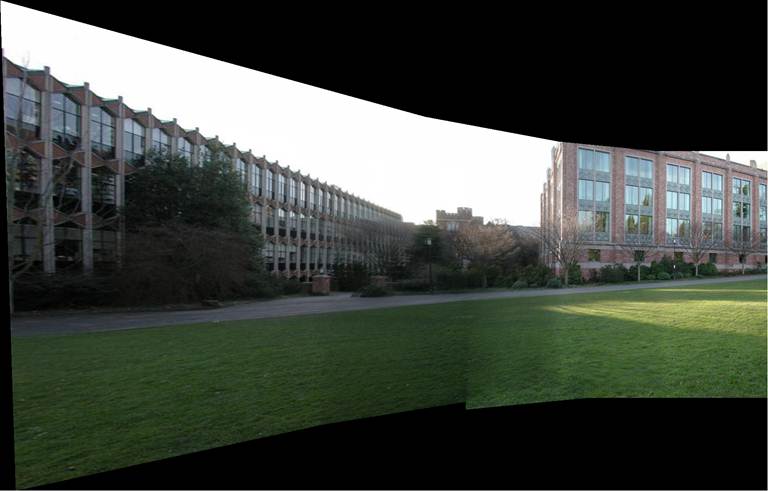
II. Panorama 1: Campus (Test Set)
The campus panorama was created from provided test images using the spherical warping method. A total of 18 images were used to construct the stitched image. The image is reasonably sharp after the blending operations; however, due to the changes in lighting from one photo to the next, the overall lighting in the image is uneven. Applying a scheme to normalize pixel intensities in each sub-image could help resolve the dark patch artifacts.
Campus Panorama – Test
Set

Links: Full Resolution Image, Interactive Panorama Viewer
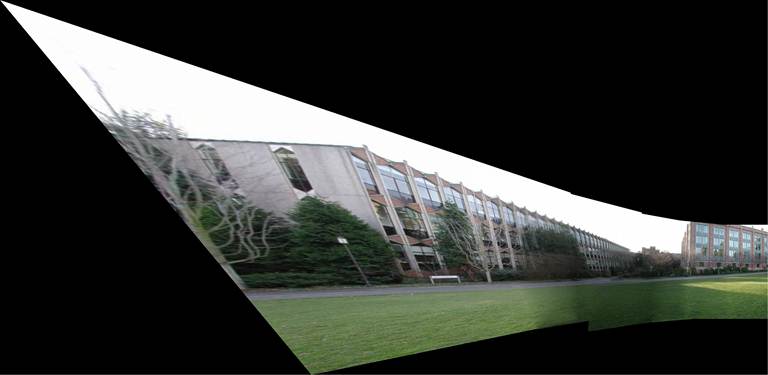
The images below were constructed with the same image set, but using direct homography transformations instead of spherical projections. Sub-images were aligned starting from the right edge of the stitched image. As you move left, farther away from the first sub-image, the distortions in the image increase. The distortions grow towards infinity as the field of view reaches 180 degrees.
Homography-based Stitching (4 Sub-images)
Homography-based Stitching (5 Sub-images)
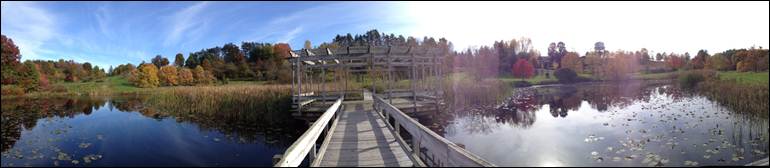
III. Panorama 2: Houston Pond, Cornell Plantations
The individual photographs used to create this panorama were taken with an iPhone 4S’s 8MP camera. The original size of each image was 3264 x 2448 pixels with a pixel size of 1.4 um. Images were scaled down to 480 x 640 resolutions for convenience. A total of 17 images were captured and used in the panorama.
Houston Pond – Panorama.exe

Links: Full Resolution Image, Interactive Panorama Viewer
Because the images were taken on a sunny but windy day, the stitched panorama exhibits some motion blur with the vegetation and varied lighting due to the movement of clouds. No features were implemented to mitigate ghosting effects.
For comparison, below is a panorama NOT created using this project’s auto-stitching feature. Instead, the image was generated using the built in Panorama mode in iOS 6 on the iPhone 4S. *Note: the iPhone-generated image only supports 180 degree panoramas.
Houston Pond – iPhone Panorama App
Links: Larger Image, Interactive Panorama Viewer
IV. Conclusions
With an accurate feature detector like SIFT and a decent matching method, it is possible to create blended panoramas that are reasonably sharp. However, during the pixel accumulation and blending process, it is easy to run into situations where black “streaks” occur in the panorama. These often occur when a pixel is inverse warped to a point outside of the rounded edges in a spherically warped image. Because the image was spherically warped, there are curved sections of empty pixels which are no longer mapped to useful data. Implementing checks to ignore contributions from these points during blending improved the quality of the resulting panorama.
A simple linear alpha blending scheme was used to composite the sub-images. Originally, the alpha value selected for a given inverse warped point was a function of the pixel distance to the boundary and blend width in both the x and y directions. However, this generalized calculation led to several small artifacts similar to the streaks mentioned above. Instead, the results were improved by computing alpha values based on 4 different situations: when the pixel is located within the blend width of the image boundary in (1) both x and y directions, (2) only x direction, (3) only y direction, and (4) neither x nor y directions.