
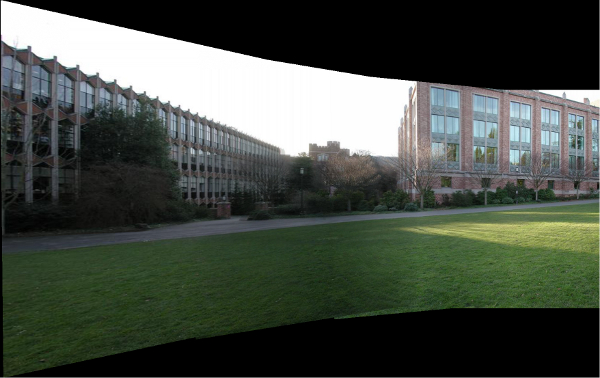
As indicated above, this was a very fun and enjoyable project. Composing images into a panorama is certainly very interesting and cool, even if it can take a lot of steps and difficulty to get there. For starters, here's the test panorama built by our code, a charming example of a nice campus green:
Here's a link to a high-resolution version if you're interested:
Awesome Full-Size VersionAnd how about low res for them kids at home who don't have a java viewer or time to click a link:
As is probably apparent, all of these were cropped slightly on the top and bottom to not have the ugly black region.
In general, our approach was highly standard. In basically all cases we followed what was expected of us for each section, ending up with working code. WarpSpherical followed the standard steps to convert each pixel to its proper new coordinates. FeatureAlign computed homographies using the svd decomposition of an extended matrix of matching points, or created a more simple translation matrix transform for the standard spherical matching. In both of these cases our approach was to simply follow what made sense, translating the lecture slides into code. This worked swimmingly.
For BlendImages we had to think a little more. In order to successfully blend the blendWidth pixels on the borders, even if the image had changed shape significantly due to a homography transformation, we decided to calculate the maximum and minimum x and y locations of the transformed image in the accumulated image location. Then, we looped through this entire possible area, performing a reverse transform to get the location that we would be at in the original image being accumulated. Using bilinear interpolation, we chose the proper weights of the proper pixels to display. This wasn't the prettiest code, but the results ended up looking pretty nice.
Our original attempt at blend images had just been to loop through every value in the image to be added, apply the homography, and place the pixel in the approximate resulting location on the accumultor with any blending determined purely by location in the original image. This was fine for standard spherically warped translational images, but did not work well at all for images where the separate images were off by a homography.
Speaking of images off by a homography, here's a partial panorama of that type:
The above was a combination of 4 images, which, as can be seen above, still looks ok, even with a large increase in size trending to left. Adding on a fifth image, however, the situation gets significantly more dire:
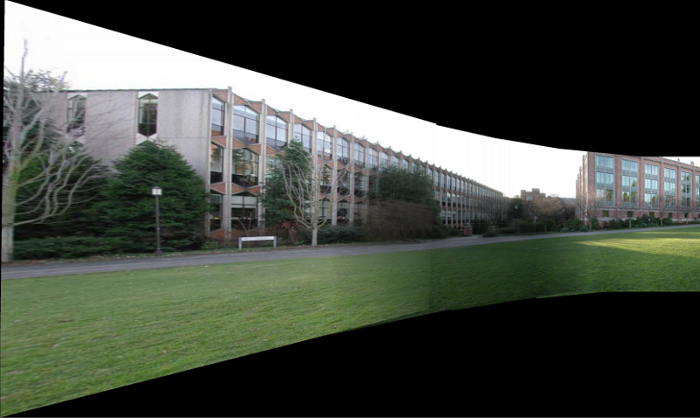
With each successive image having to match the already stretched values in the previous, the overlap becomes such a huge region that no blendwidth could reasonable prevent the artifacts seen here. Also prevalent is the very blurred out tree at left, which only continues to worsen as further homography transformed images are added.
Other than those instances we felt everything went smoothly (worked fairly well given the circumstances) and we followed standard procedures. We did find that, while both our features or sift features produced reasonable panoramas, using sift features allowed us to be confident that even with images with less-prevalent features that the images would be properly matched. As it happens, all images above this point were compsed using our features and all below were compsed using sift features.
Like last time, given time limitations (job interviews and the like), we decided not to implement any bonus in the code. To make up for this a bit, and to have some fun, the panorama we decided to do involved a random person on the floor posing a grand total of 7 times in the image, following a separate "bonus" idea. In one pose he's joined by another kid on the floor who happened to be coming through at the time and joined the fun.
Here's the video mode thing for our own personal panorama:
For those who are interested, a link to the full size version of the panorama:
Even More Awesome Full-Size Version
And for all of you out there who just want to gaze:

That pretty much sums it up. Thanks for taking the time to grade our assignment!